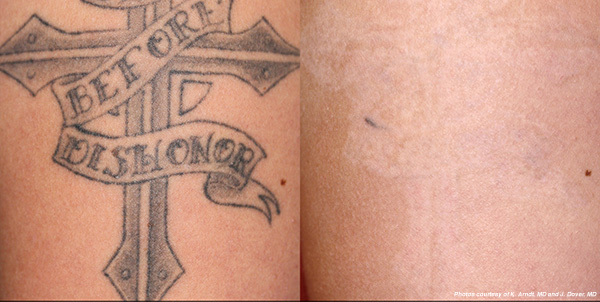
If you’re tired of a terrible tattoo, there’s hope ahead. Continual advances in laser technology have made tattoo removal more comfortable, safe, and effective.* But how can you delve into the tattoo removal laser world and know you’re getting the best possible treatment? It may not be exciting, but doing your homework will help you achieve fulfilling tattoo removal. We’ve put together a guide below to help assist you through the process, from start to finish. If you’re ever looking for some advice, don’t hesitate to get in touch – we can help you find treatment that truly fits your needs.
What to Do Pre-Tattoo Removal
Like we mentioned, it’s not super thrilling to do research at home, but it’s going to make a significant difference. Work through the following steps to make sure you find the right laser tattoo removal provider, and love your results.
- Identify your reasons for removing your tattoo – Laser tattoo removal is a process. It takes time, energy, and commitment. If you’re not motivated to make it all the way through, you may find yourself putting off your next appointment, and not removing your tattoo as fully as you’d like. Does the tattoo depict something you no longer care about? Does it bring back bad memories? Do you get frustrated with covering it up for work? Has the ink faded and left the image looking blurry and messy? Write down the reasons you’re ready to say goodbye, and keep them on hand so that you can check back in with your own goals.
- Learn exactly how tattoo removal works – When you receive a tattoo, the needle deposits ink within your skin. White blood cells flock to the area to remove the ink, which is recognized as a foreign substance by the body. But the ink particles are far larger than the white blood cells, so they can only remove a small amount of ink. Tattoo removal lasers shatter these ink particles into smaller, more manageable sizes. Then, white blood cells are able to remove them from the area and allow them to be processed by the body. This takes time and repeat treatments. With each laser session, additional ink particles are broken up, and a greater amount of ink is removed from the area. But the skin needs to be allowed to heal between sessions in order for you to be able to tackle remaining ink. Once you understand the process, you’ll see why repeat appointments and waiting periods are necessary. This schedule is best for your skin, and most likely to produce ideal results!
- Select a laser tattoo removal clinic – Choosing a laser and staff is a big decision. Look at the tattoo removal lasers available in your home or work area and consider the pros and cons. We offer treatment with the PicoSure, one of the newest and most effective laser technologies. The PicoSure is especially good for tattoos with blue, green, red or orange inks, and also helps reduce the number of sessions necessary. Make sure the staff at your chosen clinic consists of people you enjoy spending time with – this will keep you on your treatment schedule until removal is complete.
- Have realistic expectations – Every tattoo is different. Depending on the size, type of ink, ink colors, and your skin type, you may need more or fewer sessions than a friend or family member who has received tattoo removal. Multiple lasers may be necessary for ideal results. Remember, even if you don’t succeed in removing your tattoo completely, lightening the ink will still make a big difference.
The Laser Tattoo Removal Experience
- Begin treatment – Your first session will be the most stressful because you won’t know what to expect quite yet. Your technician will talk you through the process so that you’re familiar ahead of time. There will be a numbing cream or lidocaine injection to the tattoo to help numb your skin and make laser passes more comfortable. The laser will be passed over your tattoo, and then your session will be complete.
- Know the side effects – There can be a number of side effects post-treatment, including possible blisters, swelling, raised skin, redness, and temporary darkening of the tattoo. These are all temporary and will subside within 1-2 weeks.
- Practice excellent aftercare – Be sure to keep your treated tattoo protected from sun exposure. This lowers the risk of skin damage or darkened skin. Drink plenty of water to help your body process and eliminate the ink as rapidly as possible.
- Allow the skin to heal between sessions – Keep your tattoo protected and give it the proper amount of time to heal before your next appointment. Follow your technician’s instructions and get in touch if you have any questions.
- Continue treatments until you’re happy with the results – You may end up requiring more sessions than initially estimated. But in the end, the process will be worth it!
*Disclaimer: Please note that there is no guarantee of specific results. Results may vary.
